In the second part of this tiny blog series, we will enhance the example from pt. 1 to run for an authenticated user.
Create an Authenticated User
Cognito Identity Pools provide a separation of user authentication (i.e. making sure someone is really who they say they are) and user authorization (i.e. determining what users are allowed to do). Therefore, a cognito identity pool can use different authentication providers to ensure a user’s identity. Cognito’s ‚built-in‘ authentication provider is User Pools. And a user pool is what we will use for our authenticated users.
We open the Cognito console and create a new user pool. Mine is named hagen-pool. No adjustments to the default settings are needed at this time.
After the creation of the pool, we select Users and Groups and create the first user. I used one of my own email addresses, set a temporary password, and marked the email address as verified.

Now we need to define the purpose of the user pool. The users of the pool should use something. Otherwise, they would not be users at all. This is done by creating an App Client. It does not matter, what exactly the app client is supposed to do.
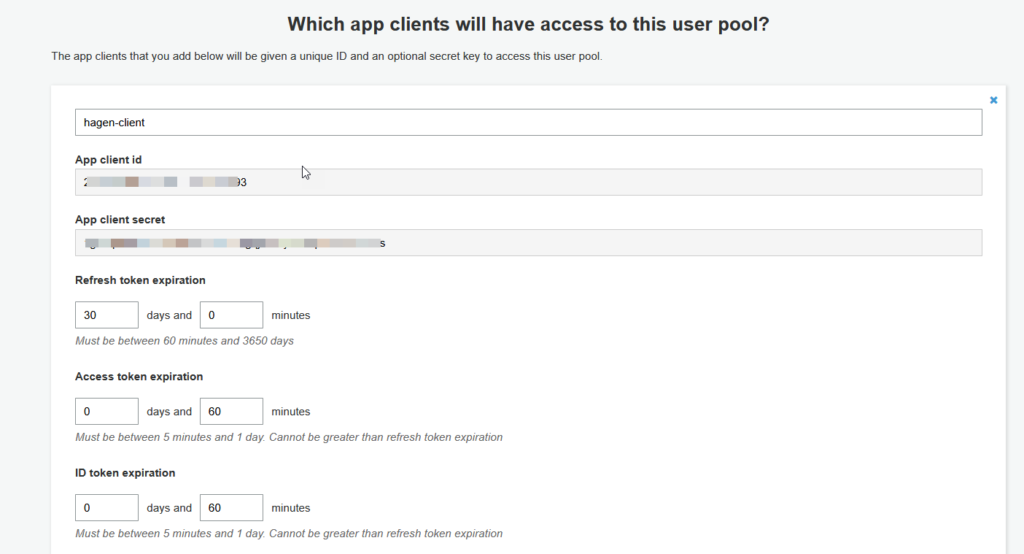
Select App clients and Add an app client. Give the client a name and hit the Create app client button. The app client page also contains the settings for OAuth authentication, which we will (hopefully) cover in the next blog of this series.
When the app client is created, it will have a client id and a corresponding client secret, which you can find when clicking on the Show Details button.
The user created in the previous step is in status FORCE_CHANGE_PASSWORD. This is not good for testing purposes. Therefore, we will need to get the initial login of the user done. For that purpose, we need to define a Domain name in the section App integration and set some attributes for OAuth in App client settings.
First, a domain:
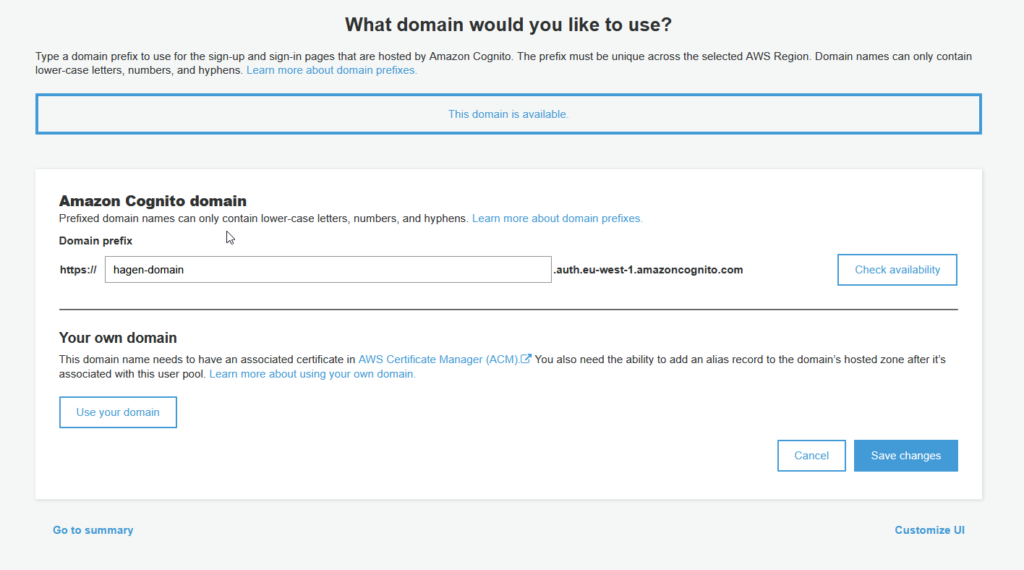
The domain name defines the URL endpoint for the authentication handling of Cognito. It is user pool-specific and needs to be unique for the AWS region.
Second, App client settings. As OAuth settings, we select Authorization code grant as the allowed authentication flow and openid as the scope.
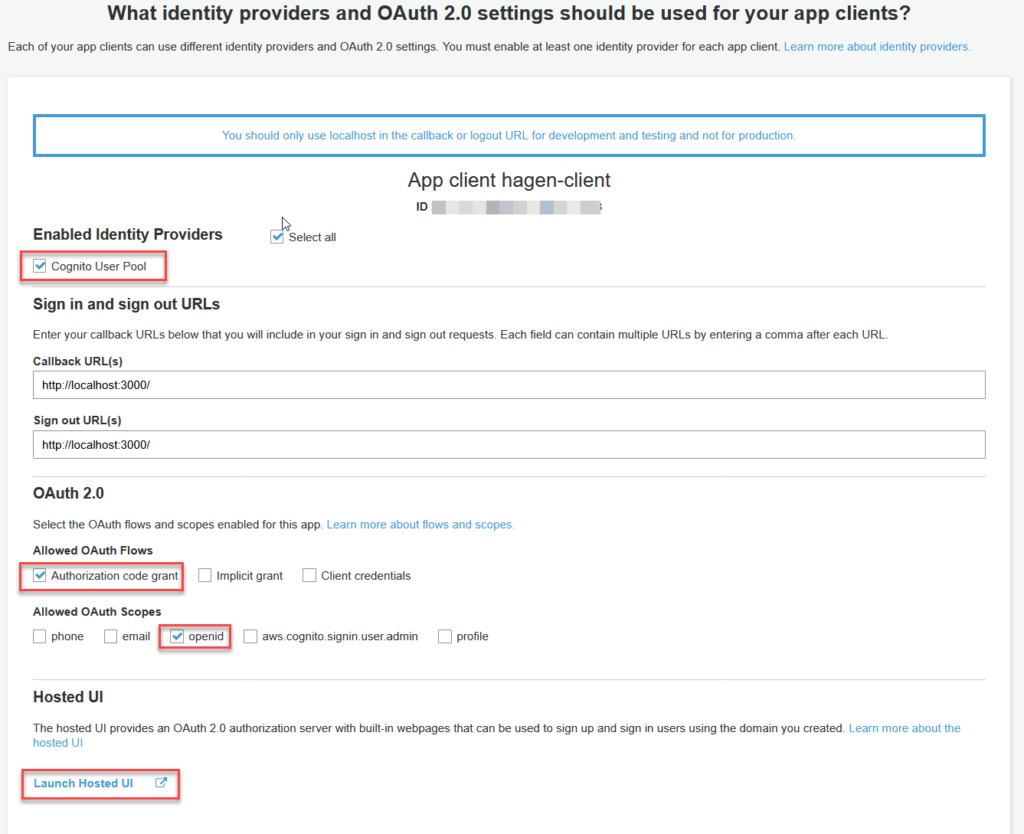
To make this work, we also have to specify callback URLs. We use localhost URLs here. Any URL leading to nowhere is good for this.
Finally, we can launch the Hosted UI.
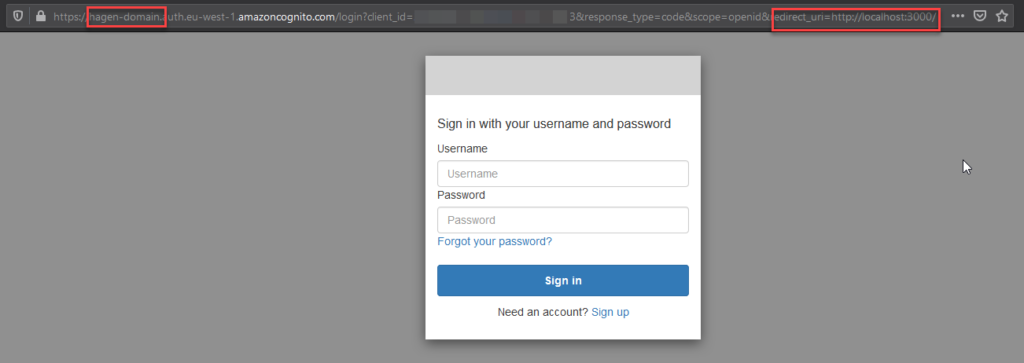
We can find our newly created domain and the redirect URL in the address line. The important thing here is that we can replace the temporary password with a permanent one. After the password change, the hosted UI redirects the browser to the given URL, which should result in some sort of ’no connection‘ error.
Now we have a valid user/password combination for an authenticated user in our Cognito User Pool. Checking the status of the user in the Users and Groups section should show the user’s status as CONFIRMED.
Get Credentials for User
Now comes the somewhat tricky part. In order to setup a test scenario where we can post requests to the API Gateway as if the requests were done by the test user, we have to allow another entity (the ‚admin‘) to get credentials for a user of the user pool.
To enable this, we activate the option ALLOW_ADMIN_USER_PASSWORD_AUTH in the user pools App clients settings.

Now we have to bring together the identity pool and the user pool. We make a copy of the User Pool Id from section General Settings and of the App client Id from section App client settings. Then we edit the identity pool (for me that’s still ‚Hagen Pool‘) in section Authentication Providers on the Cognito tab.

Now, we duplicate the collection from the previous blog entry. I attached ‚Unauthenticated‘ to one of the resulting collections and ‚Authenticated‘ to the other one (this is the one I will use for the rest of this article).
We will add a request to the collection to get user credentials directly from the user pool. This is the major difference to the method used in part 1, where we could get the (temporary) credentials directly from the identity service.
Request 0:
For this request, we will have to provide a lot of information (we make this request as the ‚all-knowing admin‘ after all). To do this, we add a bunch of variables to the collection:
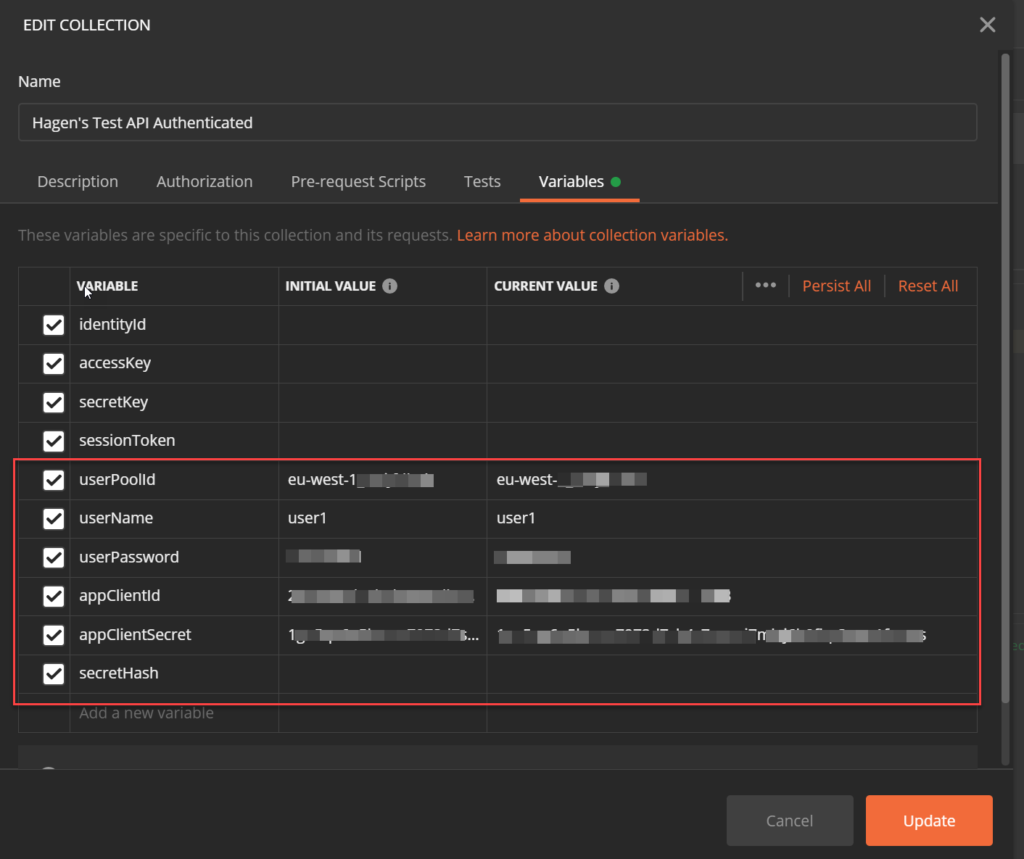
The collection variables userPoolId, userName, userPassword, appClientId, and appClientSecret are all static values and we can directly set them for the whole collection. In a real API test scenario using Postman, we would probably move them to specific Environments so we can easily switch between them for different tests.
Apart from all known parameters, there is one additional variable without an initial value: secretHash. We need this one to perform the actual login.
We add a new POST request at the beginning of our collection.
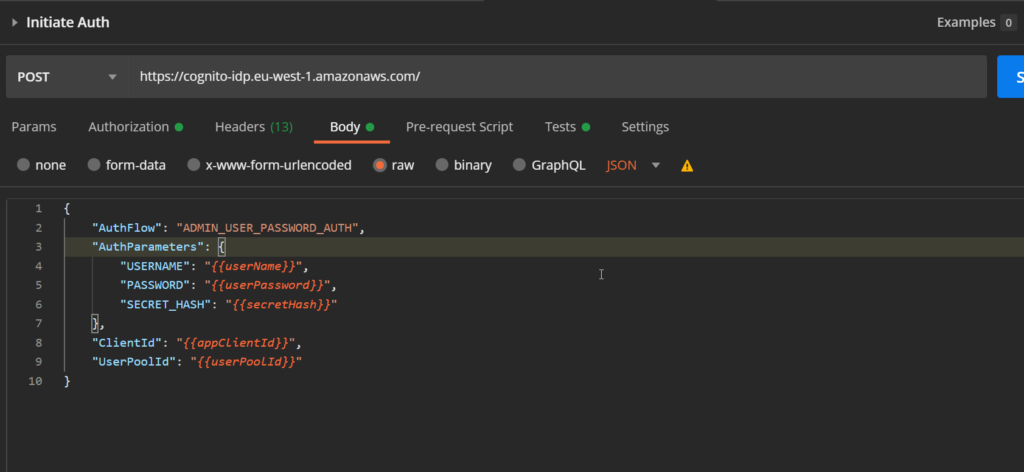
It uses the cognito-idp endpoint and requests to initiate an admin authentication flow via user and password.
The corresponding X-Amz-Target in the header is AWSCognitoIdentityProviderService.AdminInitiateAuth.

And: we need to authenticate this request with our own AWS (developer) account information. That is, for this request, we have to select AWS Signature in the Authorization tab and provide our AWS access key and secret key. The requested service is cognito-idp.

Finally, we have to generate the SECRET_HASH in the requests pre-request script. How the secret hash is calculated is described here. The corresponding Postman pre-request script looks like follows.
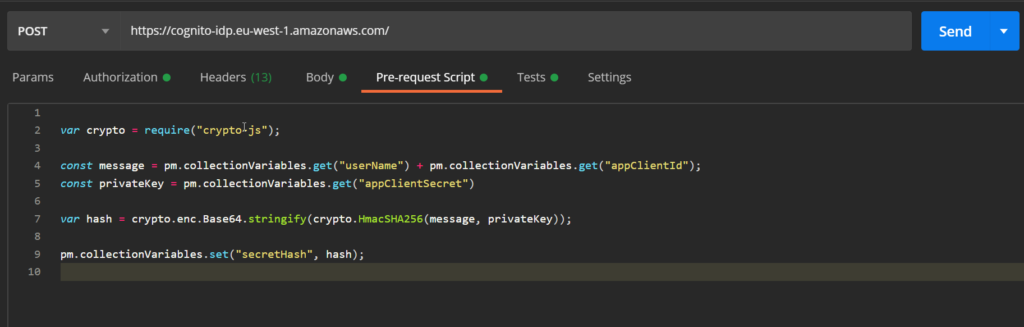
For copy & paste:
var crypto = require("crypto-js");

const message = pm.collectionVariables.get("userName") + pm.collectionVariables.get("appClientId");
const privateKey = pm.collectionVariables.get("appClientSecret")

var hash = crypto.enc.Base64.stringify(crypto.HmacSHA256(message, privateKey));

pm.collectionVariables.set("secretHash", hash);
Now we can send the request and if all our variables are set correctly and the AWS account information is valid, we get a response containing the authentication information with the 3 magic tokens: access token, id token, and refresh token.

Requests 1 + 2:
The next two POST requests in the collection make calls to the identity pool to retrieve the user credentials (access key and secret key) plus a session token for subsequent calls. We need to modify those calls to enable the identity service to detect that we are an authenticated user of a user pool.
Thsi is done by providing the login information we received from the user pool with the first call to the subsequent calls to the identity service. All the information the identity service needs is encoded in the id token. Therefore, we anhance the test script of the first request, to store this token in another collection variable idToken:
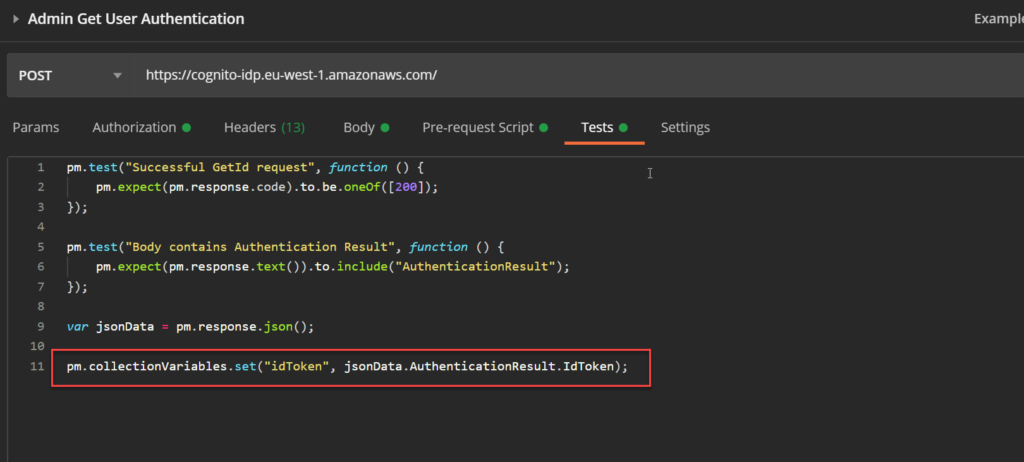
Now we can enhance the GitId and GetCredentialsForId request bodies to include the login information for the test user. This done, by adding a Logins attribute with a single key value pair to the request. The key is
cognito-idp.your-region.amazonaws.com/your-userpool_idand the value is the idToken, we got from the first request.
In GetId:
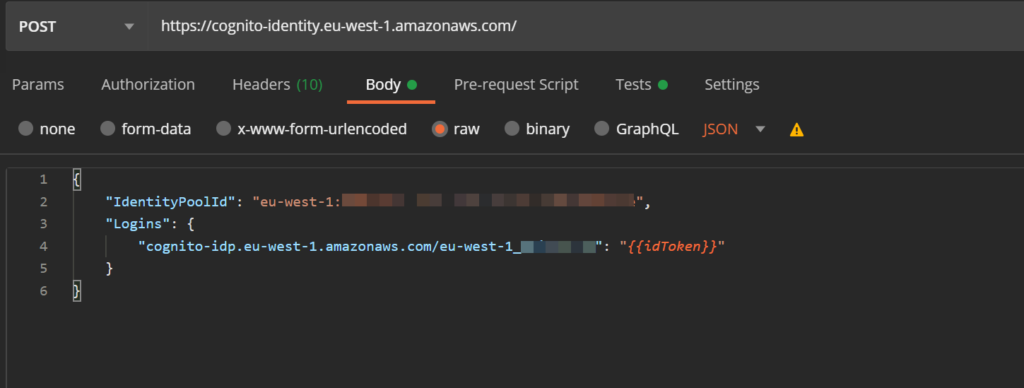
In GetCredentialsForId:

Try to make the 3 requests one ofter another. All of them should run successfully and the third one should return the precious user credentials we are after.
Final Adjustments
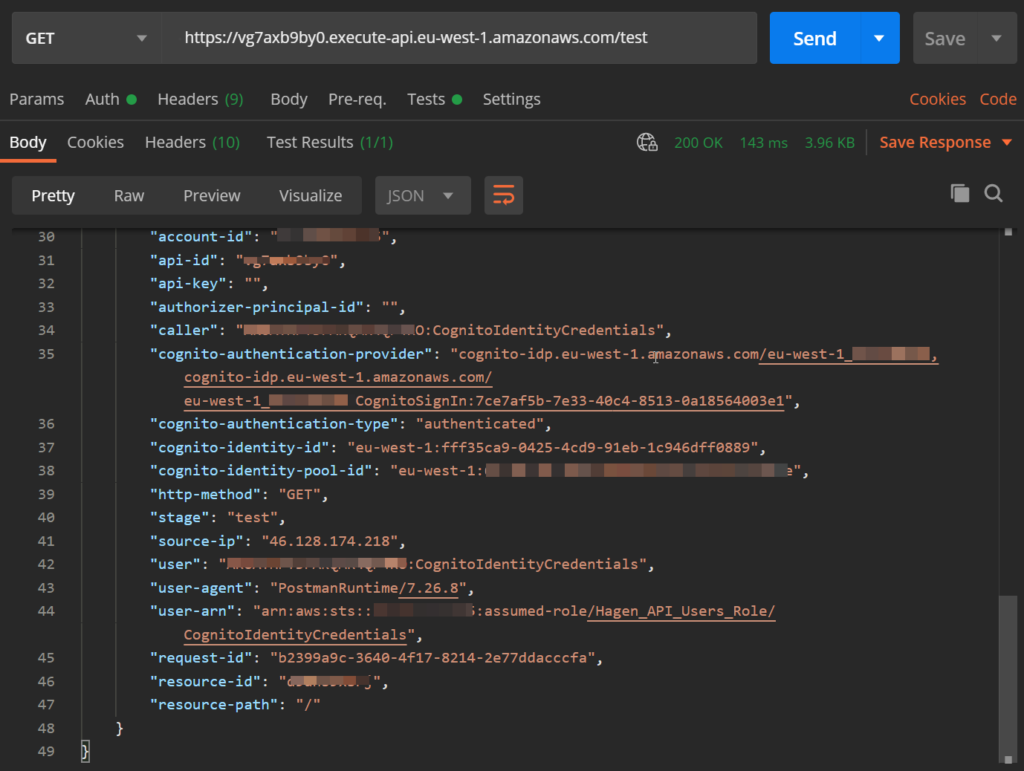
In principal, the actual GET request (‚the test‘) should also work now. In the scenario as described in this article, it will return a response like this:

Big success! Although the request itself failed with a 403 response, it clearly tells us that this call was done with the authenticated user’s credentials and that this user has no permission to invoke a GET request to the API.
To make a succesful GET request, we have to enhance the role assumed by the identity pool for authenticated users in the same way we did it for the unauthenticated ones: allow action execute-api:Invoke for the resource that represents the API method (see part 1).
After that, the whole collection should run smoothly and the final GET request returns the values defined in the API method’s response template:
Now, we could start the actual work. For a normal API this means to replace the single GET request by other requests, which usually perform a series of API calls and make the appropriate assertions on the results in their respective test scripts.
Where Do We Go from Here?
The solution for testing via Postman presented here definitely has a lot of potential for improvement.
- Each isolated test sequence needs to be setup with the 2 (for unauthenticated users) or 3 (for authenticated users) ’setup‘ calls to get the credentials. This defnitely breaks the golden rule of Never Repeat Yourself.
- The identity provider as we set it up can only assume one of the two roles we used so far. In a real-world scenario, however, authenticated users can have multiple roles.
- The authentication of users is only possible via the Cognito User Pool. Most mobile clients allow additional methods of authentication (‚Login with XYZ‘). To get closer to those scenarios, it would be desirable to use the de facto standard OAuth for authentication.
That’s definitely enough topics for one or more posts in the future.